
Pixel Comparison
Pixel Comparison is a powerful tool for image comparisons that appears in a dedicated inspector sidebar. Show it by clicking the eyedropper button in the toolbar, or via the menu command View > Show Pixel Comparison. Hide it again using the same options.
The basic idea is that this tool gives you various additional insights about pixels in your images and the differences between your image A and image B as you move your cursor across either image.
As you hover over either image, Kaleidoscope samples the corresponding pixel in both images at the same point in the view.
Quick Start
Show Pixel Comparison via the eyedropper button or View > Show Pixel Comparison
Hover over either image to sample pixels in both images
Lock a pixel with ⌥⌘L to inspect values in detail
Sections
There are various areas within the Pixel Comparison, focussing on different aspects.
Color Swatches and Hex Color Values
The topmost area shows the color currently being sampled in a larger swatch, so you can more easily evaluate it. And since it shows the current color of both images side by side, it also helps compare those colors visually.
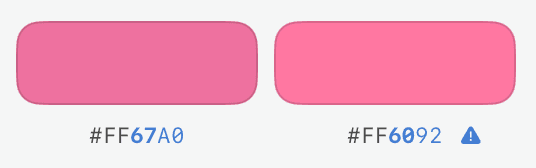
Below those color swatches, there's a simple HTML/CSS style hex color value for each pixel, giving you a very quick way to compare color values.
Notes:
Values are generally displayed in a default text color throughout the Pixel Comparison. However, if any values differ between image A and image B, both values are shown in blue to highlight that difference. Additionally, if that difference is small, the value is shown as bold, putting emphasis on small and potentially important differences.
By definition, hex colors implicitly assume sRGB color space. Depending on the color format and color space of your images, a color may need to be converted into sRGB, or may not be expressible as sRGB. Both facts will be indicated to you using small icons next to the hex color value. Click the icon to learn more.
Throughout the Pixel Comparison, text can be selected and thus copied to the clipboard or otherwise treated using the default macOS context menu. This may be handy to copy color values or other information.
Pixel Values and Image Information
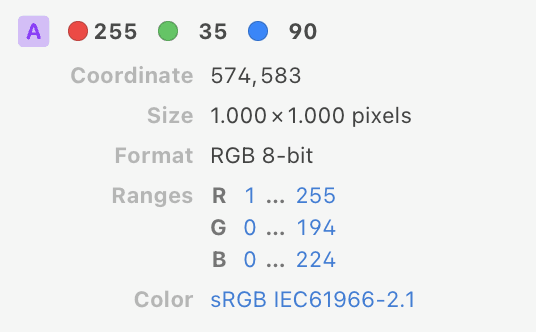
This area appears twice: once for image A and once for image B. It shows the current pixel values of all channels, as well as sampled coordinates and lots of potentially useful information about the images.
Color Channel Values
Depending on the format of your image, you may see one value (Grayscale), two values (Grayscale and Alpha), three values (RGB), or four values (RGB and Alpha).
The format used to display depends on the color format. For typical 8-bit images, you will see common values between 0 and 255, in other cases you may see float values between 0 and 1, or even below 0 and above 1, for HDR images you may see very large values.
Coordinate
When comparing two images of different sizes, this information may help you understand why pixels differ.
Image Information
Size shows the pixel dimensions of the image.
Ranges displays the actual range of values per channel. If all channels have the same range, you will see a single pair of values.
Color shows the Color Space of the image, either as saved in the original file, or in a default display format in case the file has been converted when loading.
Notes:
Kaleidoscope renders all pixels in either RGB or Grayscale format, with optional alpha channel. Image files in other formats will be automatically converted when loading.
Same goes for RAW photos from digital cameras, they will be converted into RGB by macOS when loading. The bit depth depends on the fidelity of the original image. If you want to control this conversion, do it in a dedicated photo editing app.
Difference View
The Difference View contains two parts: a single value and bar as well as a way to compare the colors of the two images in different formats.
Difference Value
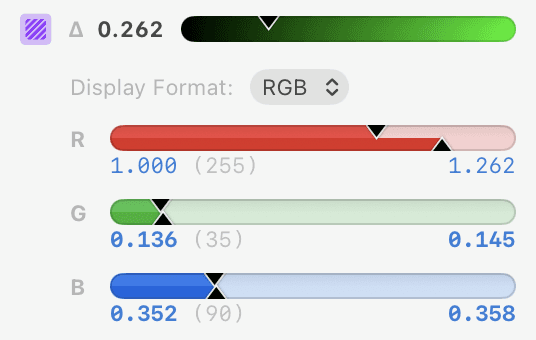
The value next to the Delta character shows the relative difference between the two pixels in image A and image B, in ranges from 0 (identical) to 1 (completely different). The bar next to it shows that value on a color gradient, going from the identical color on the left to the different color on the right. These are the very same colors that will be shown as a mask on top of the image in Difference View when set to Relative (customizable in Settings > Images)
Format Comparisons
The lower part of the Difference View lets you compare the two colors in different formats: RGB, HSB, HSL, and Lab. Choose the desired format from the pop-up menu. Your choice will be remembered for future comparisons.
For each bar, you will see the value of image A on the left below the bar and indicated in a triangle pointing in from the top. The value of image B will be shown on the right and indicated in a triangle pointing in from the bottom. This helps recognize even small differences between values.
Notes for RGB(A) or Grayscale formats:
Two colors can only be compared in a common format and color space, and with a common range.
If the original colors come in different ranges or formats, Kaleidoscope will automatically convert them. There are two potentially interesting cases:
If the original ranges differ (see screenshot below), the "more detailed" will be used for the comparison. The original value in the less detailed range will be shown in parentheses, enabling you to associate the value with the one in the Pixel Values area.
In certain cases, even the choice of the common color space may be ambiguous. In that case, you may see an option to choose your preferred one.
Locking Pixel Samples
By default, the Pixel Comparison continuously samples the underlying pixels of both images as you move your cursor across either image. This makes it easy to quickly explore changes interactively.
But sometimes you want to focus on a specific pixel and ensure it stays the same while exploring various values. Use the Lock functionality to achieve this, using one of the following methods:
Double-click a pixel in either image.
Select Lock Pixel Sample from the context menu on either image.
Use the keyboard shortcut ⌥⌘L of the menu command View > Lock Pixel Sample.
To unlock, use a single click or any of the same methods again.
Settings
These Image Settings influence the Pixel Comparison:
Toggle whether Pixel Comparison is shown automatically for new Image Comparisons
Configure the Difference bar by setting the colors for different and identical regions